

-
Azure AD Domain Services for Linux authentication
Posted on November 23rd, 2019 No commentsNOTE: I do not mean for this to be an exhaustive guide on how you should implement security on your *nix infrastructure, so make sure you’ve thought this out. There are also some larger Azure AD design considerations you should research more before proceeding as well.
A customer with on-premises Active Directory infrastructure syncing to Azure Active Directory (AAD from here on), for Office 365 primarily, wanted to enable AD authentication on their *nix systems in Azure. The customer was adamant they did not:- want to deploy/pay for any Windows systems if it could be avoided
- want the *nix infra reaching back over the VPN to on-prem
- want to deploy any 3rd party software (ie: Centrify, or something like that)
- want to deploy a shadow OpenLDAP+Kerberos system
To fulfill these requirements, enter stage right: Azure AD Domain Services.
This would be a new adventure for me, since most people have/are willing to deploy windows in Azure. This tool essentially provides, what amounts to, read-only Domain Controller services without the overhead of a Windows operating system. It then synchronizes (ONE-WAY!!!) from AAD, which is being fed from the on-premises AD infra. You should read the docs more, but while its a one-way push, you can do some things like create OU’s and other fun stuff… but thats way out of scope from the spirit of this post.1.) The first step down this road is to deploy Azure AD Domain Services (lets shorten this to from here on to ADDS). There are some things to consider here, and as stated, I am not going to be exhaustive. At the time of this writing, it would appear you can only have one ADDS per tenant, so think long and hard about where you decide to site this.
Some things I had to think about and decisions I made when I spun ADDS up (just as a small example):- Where is my customer primarily hosting their VM’s? (US Central)
- Do I want to put it inside its own Virtual Network? (YES)
- Review firewall configuration required.
- Create peering from *nix machine Virtual Networks to the ADDS Virtual Network.
- Change subnets the *nix machines run in to use ADDS for DNS.
- Do I have any strange/internal DNS considerations to worry about? (Thankfully, NO)
- Will the customer want to administer ADDS beyond the Azure console in the cloud? (Thankfully, NO. Otherwise they would HAVE to deploy a Windows machine in Azure, see: https://aka.ms/aadds-admindomain)
After thinking about those, and many other things, ADDS spun up without drama in about 30 minutes. I then did some of my prerequisite DNS changes in various subnets.
2.) The next obvious step is, configure the *nix machines to use this new ADDS functionality you deployed. Here is a very rough guide on how I did this. Again, there is so much nuance to this… you really need to plan this out and lab it up like any SSO project. This is bare bones as it gets here.
2a.) Reconfigure the machine to use the new ADDS DNS ip’s. In my case, the machines were all using DHCP so nothing to do except bounce the lease. If you are managing DNS outside of DHCP, you will have o “do the thing” with nmcli, resolv.conf… whatever applies to your environment.
2b.) Install the necessary packages. In my demo, I’m on CentOS 7.x:
# yum install -y realmd oddjob oddjob-mkhomedir sssd samba-common-tools adcli krb5-workstation
2c.) Configure the machine to use ADDS:
We have a couple different paths we can take here: realm or adcli. In my case, realm as A-OK for my use case. XXXXX == being ADDS name of course.
[root@XXXXXX-www01 ~]# realm join XXXXXX.onmicrosoft.com -U adminuser@XXXXXX.ONMICROSOFT.COM -v
* Resolving: _ldap._tcp.XXXXXX.onmicrosoft.com
* Performing LDAP DSE lookup on: 10.0.3.5
* Successfully discovered: XXXXXX.onmicrosoft.com
Password for adminuser@XXXXXX.ONMICROSOFT.COM:
* Required files: /usr/sbin/oddjobd, /usr/libexec/oddjob/mkhomedir, /usr/sbin/sssd, /usr/bin/net
* LANG=C LOGNAME=root /usr/bin/net -s /var/cache/realmd/realmd-smb-conf.RQ0NB0 -U adminuser@XXXXXX.ONMICROSOFT.COM ads join XXXXXX.onmicrosoft.com
Using short domain name — XXXXXX
Joined ‘XXXXXX-WWW01’ to dns domain ‘XXXXXX.onmicrosoft.com’
* LANG=C LOGNAME=root /usr/bin/net -s /var/cache/realmd/realmd-smb-conf.RQ0NB0 -U adminuser@XXXXXX.ONMICROSOFT.COM ads keytab create
* /usr/bin/systemctl enable sssd.service
Created symlink from /etc/systemd/system/multi-user.target.wants/sssd.service to /usr/lib/systemd/system/sssd.service.
* /usr/bin/systemctl restart sssd.service
* /usr/bin/sh -c /usr/sbin/authconfig –update –enablesssd –enablesssdauth –enablemkhomedir –nostart && /usr/bin/systemctl enable oddjobd.service && /usr/bin/systemctl start oddjobd.service
* Successfully enrolled machine in realmAt this point, unless you want to fully qualify your users, you might want to edit your /etc/sssd/sssd.conf and change use_fully_qualified_names to: False and then restart the sssd daemon.
3.) At this point, if all has gone well, you should be able to see the user objects & groups which have flowed from on-prem to ADDS:
[root@XXXXXX-www01 ~]# id testuser
uid=691801111(testuser) gid=691800513(domain users) groups=691800513(domain users),691801104(aad dc administrators),691801113(linux-sudo_all),691800520(group policy creator owners),691801102(dnsadmins),691800572(denied rodc password replication group)[root@XXXXXX-www01 ~]# groups testuser
testuser : domain users aad dc administrators linux-sudo_all group policy creator owners dnsadmins denied rodc password replication groupAt this point, … time to start configuring things like your allowed ssh groups, sudoers … all that fun stuff. Extra points if you manage your SSH keys in a secure and automated fashion as well for another layer of security.
Some final thoughts:
If you’ve used Azure AD Connect, you know there can be lag issues for the impatient. ADDS adds yet another layer into the mix. On top of everything else, you’re now waiting for AAD to synchronize into ADDS too. So between on-prem -> AAD -> ADDS … it can be a while for changes/new objects to become a reality. Keep this in mind, and if this is a non-starter for you… look for another solution.
This customer pretty much doesn’t even allow interactive access to their production *nix infra (a good thing!), so this was really just needed for the basics if the … you know what … hit the fan.
My customer was a small shop, so the pricing worked out to be about (at the time of this post) around $110/mo for ADDS. They considered this a huge win over a Windows VM + the overhead of managing and securing it.Til next time…
-
Outlook 2016 constantly prompts for password on first start with Azure AD / Office 365
Posted on June 3rd, 2019 No commentsHey folks,
After many years since my last, I’m doing yet another Office 365 migration. I’m fortunate that everyone is on Outlook 2016 and Windows 10… not too much legacy baggage there. This time around, I’m using Azure AD Sync + Pass-through authentication. The last migration I did, this functionality wasn’t even available.. I had to use Okta and then eventually OneLogin to accomplish my goals.
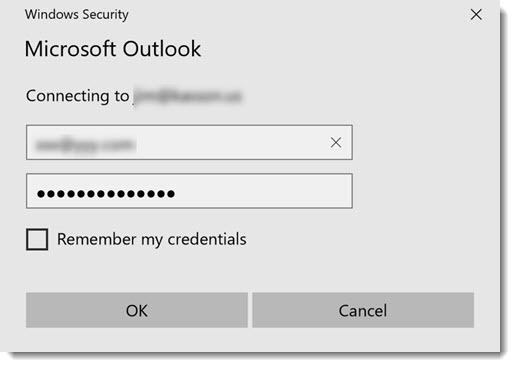
At first, everything seemed to be working fine, no password prompts using OWA with IE/Edge and Chrome. This was all good for me, since I tend to use OWS 100% when I’m on Office 365.
SADLY: Outlook itself was prompting for a password on first start / launch. The dreaded Outlook credential begging window in all its glory:
I went back through the manuals, looked at all of my Azure AD config… couldn’t figure it out. In my desperation, I ran across this blog: Jaap Wesselius: Single Sign-On and Azure AD Connect Pass-Through Authentication
The key step I missed (or didn’t know about?):
Set-OrganizationConfig -OAuth2ClientProfileEnabled:$true
After enabling that, I was immediately in business and no more password prompting from Outlook! Hopefully this helps someone, because this is yet another dark alley I see a lot of people struggling through.
Til next time…
-
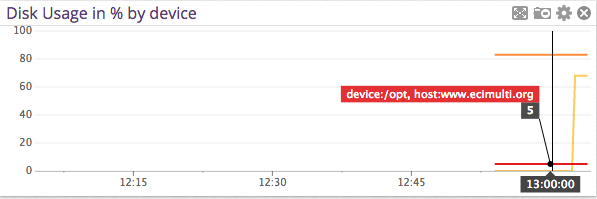
Making Datadog report mount points vs. device names
Posted on March 10th, 2015 No commentsThis will seem like a really dumb post, but I scratched my head on this for a bit. I really wanted my Datadog storage dashboards to report mount point name vs. device names. I couldn’t really find much help within Datadog’s documentation either.
After going down a few paths, I bumped into this in the datadog.conf:
# Use mount points instead of volumes to track disk and fs metrics

use_mount: no
I changed that over to yes, and boom … problem solved!
-
Hybrid Office 365: new cloud users are missing from the hybrid / on-premises address book
Posted on November 25th, 2013 No commentsHi everyone,
Like many other people, I’m in the process of retiring an on-premises Exchange 2007 platform to Office 365. We’re using DirSync+ADFS, but not in rich coexistence mode.
I ran into a situation today where a net-new user had been created in Active Directory Users & Computers, and then subsequently had Exchange licenses assigned manually in the 365 admin portal. This is in contrast to using the EMC or PowerShell to create a “remote mailbox” proceedure. All was well for the user, except for the fact they were not being included in the on-premises address book.
I did some research and comparisons, and it came down to adding this attribute with ADSIedit. Now keep in mind, these are just an example. Make sure you look at a user in YOUR organization to come up with the right DN’s to add!
CN=All Users,CN=All Address Lists,CN=Address Lists Container,CN=Example Company,CN=Microsoft Exchange,CN=Services,CN=Configuration,DC=exampledomain,DC=local
CN=Default Global Address List,CN=All Global Address Lists,CN=Address Lists Container,CN=Example Company,CN=Microsoft Exchange,CN=Services,CN=Configuration,DC=exampledomain,DC=local
After adding those to the user, I forced an address book update and they magically appeared! I found a few threads on the Office 365 support forum on how to fix this, but this method I came up with was by FAR the easiest. I saw some people proposing dumping the whole DirSync’d user list to a csv and doing all sorts of crazy kung fu on it. I guess if you had made this mistake on a wide scale that is the proper way to think about it.
I’m also told that if we were in rich coexistence mode and moved the OAB to the hybrid Exchange 2010 box, this would also solve any issues.
Til next time…
-
EMC Avamar Windows Server 2008 R2 VSS backup fails with: System Writer is not present
Posted on July 11th, 2013 No commentsWelcome back everyone,
Today’s random backup failure is brought to you by the number: infinity. Well, thats how many .NET temp files I seemed to have on a server that refused to complete its VSS backup.
On this particular SharePoint 2010 machine, when a VSS backup would run it bombed with this error:
2013-07-11 18:04:50 avvss Info : VSS: Creating vss version 6.0 or greater object
2013-07-11 18:04:50 avvss Info : Gathering writer metadata…
2013-07-11 18:04:51 avvss Error : Can not continue disaster recovery backup because the System Writer is not present, exiting.
2013-07-11 18:04:51 avvss Info : Final summary generated subwork 0, cancelled/aborted 0, snapview 0, exitcode 536870919
2013-07-11 18:04:56 avvss Info : uvss returning with exitcode 536870919I tried all of the usual VSS writer DLL re-register & permissions fix tricks I knew (which technically aren’t recommended on Server 2008 R2!), but alas nothing would bring the System Writer back. Becoming almost apathetic about the issue, I then bumbled onto this TechNet Social post.
It gets interesting about halfway down with a post from “Rosaceae” & “Microbolt”. I’ve quoted their discussion below, should that link ever die.
I checked out my .NET Framework temp directories, and there were about 100k files in there going back to 2009. I cleaned them out, restarted the Cryptographic Service and wouldn’t you know it, the VSS System Writer came back and my backup was successful!
By the way, the Cryptographic Service is probably about the most unintuitive service name that could relate to a VSS component Microsoft could think of.
I’m going to keep my eye on this and see if I end up needing to relocate my .NET Framework temp files like Microbolt did, but I’m guessing not. It looked as if some developer was trying out some new/bad code and caused it.
So thanks to both of those people, I would’ve been stumped without it.
Till next time…
Hi,
I’ve got this problem about a month ago. I refer to MSP.
The problem was caused due to stack full. When we list system writer using “vssadmin list writers”, it will go through all the system files. To do that, the OS use a search algorithm with a stack which has a size limitation of 1000. When the stack was full, it failed to continue listing files and log an event in the application event log.
In my case, the following folder contains too many subdirectory and caused the problem.
C:\Windows\Microsoft.Net\Framework64\v2.0.50727\Temporary ASP.NET Files\*
1. Open C:\WINDOWS\Microsoft.NET\Framework64\v2.0.50727\CONFIG\Web.config
2. Add tempDirectory attribute to compilation tag. For example:
< compilation tempDirectory=”c:\ASPTEMP”>
And also grant the folder with the same privilege with as “C:\Windows\Microsoft.Net\Framework64\v2.0.50727\Temporary ASP.NET Files”.
3. Restart the IIS Service.
4. Backup and delete all files under “C:\Windows\Microsoft.Net\Framework64\v2.0.50727\Temporary ASP.NET Files”.
5. restart the Cryptographic Service.
6. Try “vssadmin list writers” again.
Hopes this brings idea for you to solve it.Thanks Rosaceae!
After going on a wild goose chase setting permissions and nothing working I got looking around in the .Net Folders per your advice. It looks like in my case I had the same issue with you except in the Framework instead of Framework64 (as most of my web apps are running x86).
I’ll share what I did incase it helps anyone (Ignore that last two of each step if you don’t have .Net 4.0 Installed):
Created 4 Folders:
C:\Asp.net Temp Files\2.0.50727\x86
C:\Asp.net Temp Files\2.0.50727\x64
C:\Asp.net Temp Files\4.0.30319\x86
C:\Asp.net Temp Files\4.0.30319\x64
Set Permissions on the folder (This is how I set them, may be different on your server. Check existing “Temporary ASP.NET Files” directory for permissions on your server
icacls “c:\Asp.net Temp Files” /grant “BUILTIN\Administrators:(OI)(CI)(F)”
icacls “c:\Asp.net Temp Files” /grant “NT AUTHORITY\SYSTEM:(OI)(CI)(M,WDAC,DC)”
icacls “c:\Asp.net Temp Files” /grant “CREATOR OWNER:(OI)(CI)(IO)(F)”
icacls “c:\Asp.net Temp Files” /grant “BUILTIN\IIS_IUSRS:(OI)(CI)(M,WDAC,DC)”
icacls “c:\Asp.net Temp Files” /grant “BUILTIN\Users:(OI)(CI)(RX)”
icacls “c:\Asp.net Temp Files” /grant “NT SERVICE\TrustedInstaller:(CI)(F)”
Add tempDirectory attribute to compilation tag. This will keep you from having the problem again in the future. Add the following attribute to these files:C:\WINDOWS\Microsoft.NET\Framework\v2.0.50727\CONFIG\Web.config
C:\WINDOWS\Microsoft.NET\Framework64\v2.0.50727\CONFIG\Web.config
C:\WINDOWS\Microsoft.NET\Framework\v4.0.30319\CONFIG\Web.config
C:\WINDOWS\Microsoft.NET\Framework64\v4.0.30319\CONFIG\Web.config
Restart IIS so that it will use the new Temp Directory
iisreset
Deleted old Temp Files
rmdir /s /q “C:\Windows\Microsoft.Net\Framework64\v2.0.50727\Temporary ASP.NET Files\root”
rmdir /s /q “C:\Windows\Microsoft.Net\Framework\v2.0.50727\Temporary ASP.NET Files\root”
rmdir /s /q “C:\Windows\Microsoft.Net\Framework64\v4.0.30319\Temporary ASP.NET Files\root”
rmdir /s /q “C:\Windows\Microsoft.Net\Framework\v4.0.30319\Temporary ASP.NET Files\root”
Restart Cryptographic Service
net stop cryptsvc
net start cryptsvc
Now if all goes well you should be able to see the “System Writer” again!
vssadmin list writers -
Configuring impersonation for use with Veeam Exchange Explorer.
Posted on November 21st, 2012 No commentsSo, … you just got your Veeam platform upgraded to 6.5, and now you’re ready to use Exchange Explorer to do some item level recovery hotness. You choose the “Restore to …” option and POW you get this error:
“The account does not have permission to impersonate the requested user.”

I’m not much of an Exchange engineer anymore, but I remembered something like this in Exchange 2007 when you wanted to do item level restore with EMC Avamar. To get past this, you must grant the account you’ve launched the Veeam managment console with the ability to impersonate the target user.
This is easily accomplished with the following Exchange Managment Shell command:
New-ManagementRoleAssignment -Name:impersonationAssignmentName -Role:ApplicationImpersonation -User:enter_your_account_here
If this is a role you’re not comfortable leaving enabled on this account, you can quickly remove it with this command:
Get-ManagementRoleAssignment | Where {$_.Role -eq “ApplicationImpersonation” -and $_.RoleAssigneeName -eq “enter_your_account_here“} | Remove-ManagementRoleAssignment
It’s also possible to this on a PER mailbox if you really want, but I’d just reccomend keeping this managment role enabled on your Veeam service account.
As a side note…. Exchange Explorer is a pretty amazing plug-in for Veeam 6.5. The features they continue to develop on this software is amazing, especially when you consider its price point.
Til next time…
-
VMware vSphere ADAM/LDS issues after an in-place OS upgrade.
Posted on July 26th, 2012 No commentsI’m not a huge fan of doing in-place OS upgrades, but sometimes its just a necessary evil. Today I upgraded one of our vCenter servers from Server 2003 R2 64-bit to Server 2008 R2, which is a supported upgrade path from Microsoft.
The OS upgrade itself went smoothly, but about 10 minutes after the final reboot vSphere Service Status alerted on these two issues:
- LDAP replication health monitor – Failed to initialize LDAP instance manager
- LDAP backup task monitor – JoinTool initialization error
If you didn’t already know, vCenter relies upon Microsoft ADAM which was renamed Lightweight Directory Service. vCenter uses this as a repository for things like roles, license keys and many other metadata-ish stuff.
I searched around the VMware KB & Google and really didn’t find anything useful. Then I dug through the vCenter Webservices Logs (vws.log), and ran into this:
Action: Local ldap environment verification
Problem: LDAP tools not found in “C:WindowsADAM”I zeroed in on: Problem: LDAP tools not found in “C:WindowsADAM and compared that directory between a known working vCenter on Server 2008 R2 and this problem child server.
Sure enough 3 files were missing:
- DSACLS.EXE
- LDIFDE.EXE
- REPADMIN.EXE
After synchronizing that directory with the working server, I restarted vCenter Web Services and the errors went away! My assumption would be that during the upgrade those files were nuked as the LDS role was re-applied.
For folks who might not know, here’s a VMware KB article for log file locations: KB1021804
Till next time…
-
EMC CLARiiON CX Disk Offset Configuration
Posted on March 17th, 2010 No commentsI’ll be updating this with various OS method of setting the disk offset. This is mostly for me to consolidate my notes. It should be noted this is valid for MOST current EMC disk technologies, but you should always consult the documentation to make sure.
If anyone has an OS to add, or sees an error let me know.
Microsoft Windows Server 2003:
- Start -> Run -> cmd.exe
- diskpart.exe
- List disk and find the new LUN you’re wanting to offset by number
- select disk #, where # = the LUN you wanted in step 3.
- create partition primary align=X, where X = 32, 64 or 128 (in my case, 64).
- format the disk in disk manager/assign a letter/use a mount point.
Microsoft Windows Server 2008:
Technically this is no longer required. This is because Server 2008 automatically sets the offset to 1MB on partition creation.
Linux / older (2.x) ESX / etc:
- On service console, execute “fdisk /dev/sdX” (or “fdisk /dev/emcpowerX” for clariion systems), where X is the device on which you would like to create the new partition (a, b, c, etc).
- Type “n” to create a new partition
- Type “p” to create a primary partition
- Type “1” to create partition #1
- Select the defaults to use the full disk.
- Type “t” to change partition type
- Type “1” to select partition #1
- Depending on your Linux environment and need: type “83” to set type to Linux partition, or type “82” to set type to Linux swap, or type “8e” to set type to Linux LVM, or type “fb” to set type to VMFS (vmware file system). For other partition types, type “L” to display the list of codes.
- Type “x” to get into the expert mode
- Type “b” to specify the starting block of partitions
- Type “1” to select partition #1
- Type “128” to make partition to align on 64KB boundary (block No. 128)
- Type “w” to write new partition information to disk.
- Exit fdisk and format the partition with your favorie filesystem.
Solaris:
To be added.
-
Making Exchange 2007 perform on ESX.
Posted on March 11th, 2010 No commentsFor a couple years we’ve maintained a full lab environment of our production hosted Microsoft Exchange 2007 CCR cluster. I have to be honest, and the Exchange administrator would agree, its never really performed that well. Finally the Exchange admin pretty much got ticked at the performance the other day and while he was out on vacation I thought I’d see what I could do. Its now performing about 100x the speed it ever did, and when he comes back Monday I hope he’s happy. More than anything we’ve just not had the time to really dig into the issue(s).
Needless to say over these couple years we’ve all learned quite a bit about how to eek more performance out of ESX, and in particular Exchange on ESX. I thought I’d share a bunch of the concepts and tidbits in one spot I used to arrive at better performance. The old tricks of throwing RAM and vCPU’s at the problem just didn’t cut it.
Its worth noting that people these days might not choose to use CCR on a virtualized environment (or never did), however I feel these concepts bleed over into stand-alone or maybe even FT/vLockStep implementations going forward.
First and foremost, I invite you to read this article on Exchange 2007’s memory managment strategy:
http://msexchangeteam.com/archive/2008/08/06/449484.aspx
Okay, now that you’ve read that lets continue. Suffice it to say Exchange literally grabs every piece of memory and page it can…. if you let it (which most people do for cache/performance reasons).
As most of you reading know, ESX has quite a few tricks up its sleeve in the memory management department itself and I invite you to read about those concepts in the vSphere/ESX manuals. Obviously the VM’s have access to physical RAM, shares RAM pages when possible, begs/borrows/steals from other VM’s (balloon) and when necessary swaps to disk as a last resort. After careful examination of the performance logs of the Exchange VM’s, it became very obvious ESX was swapping.
Now, we happen to have an entire lab cluster and nobody really cares about performance … well nobody except the persnickity Exchange admin anyway. After doing some research I came to the conclusion I didn’t want the Exchange servers to swap memory … period. I then set a reservation on the VM to the exact same size as the RAM I’d granted. In this case 3GB. This effectivly disables the vswap since the host has no choice but to ante up. Doing just this provided an incredible performance boost to the Exchange cluster, but I scratched a little deeper.
Within the VM itself I observed that it was paging quite a bit, and as the above referenced article shows… it always will. So to extract maximum paging performance I decided to create a couple LUN’s and mapped them raw (RDM) to the Exchange servers. I then did some research and came to the conclusion 4kb was the optimal block size for a raw paging volume and if anyone has differing opinions on that PLEASE post them. I then created page files equal to granted memory +20MB. After doing all of that and rebooting, I could tell we’re really cooking with gas now.
Going forward I would like to talk to the Exchange adminstrator about migrating his VMDK based message stores to RDM as well.
So, in closing … hopefully some of these ideas will help you come up with your own Exchange performance issue resolution. I’m sure there are more tricks I need to find, but right now I’m pretty happy with the results.
Till next time…
-
Why did sysprep get so hard for Server 2008, Vista and Windows 7?
Posted on October 28th, 2009 No commentsI know I’m way behind the curve on this, but why did sysprep have to get so difficult on the newer server and workstation operating systems? For quick hit deployments, the 20 line .ini file worked just fine. XML, the wave of the future. I’m thinking about writing a quick webpage that cranks out the XML for you without having to crack open WIM’s and install an almost 3GB deployment toolkit.
That’s really all I had to say after a long lapse in posting 🙂
Till next time…
