

-
Azure AD Domain Services for Linux authentication
Posted on November 23rd, 2019 No commentsNOTE: I do not mean for this to be an exhaustive guide on how you should implement security on your *nix infrastructure, so make sure you’ve thought this out. There are also some larger Azure AD design considerations you should research more before proceeding as well.
A customer with on-premises Active Directory infrastructure syncing to Azure Active Directory (AAD from here on), for Office 365 primarily, wanted to enable AD authentication on their *nix systems in Azure. The customer was adamant they did not:- want to deploy/pay for any Windows systems if it could be avoided
- want the *nix infra reaching back over the VPN to on-prem
- want to deploy any 3rd party software (ie: Centrify, or something like that)
- want to deploy a shadow OpenLDAP+Kerberos system
To fulfill these requirements, enter stage right: Azure AD Domain Services.
This would be a new adventure for me, since most people have/are willing to deploy windows in Azure. This tool essentially provides, what amounts to, read-only Domain Controller services without the overhead of a Windows operating system. It then synchronizes (ONE-WAY!!!) from AAD, which is being fed from the on-premises AD infra. You should read the docs more, but while its a one-way push, you can do some things like create OU’s and other fun stuff… but thats way out of scope from the spirit of this post.1.) The first step down this road is to deploy Azure AD Domain Services (lets shorten this to from here on to ADDS). There are some things to consider here, and as stated, I am not going to be exhaustive. At the time of this writing, it would appear you can only have one ADDS per tenant, so think long and hard about where you decide to site this.
Some things I had to think about and decisions I made when I spun ADDS up (just as a small example):- Where is my customer primarily hosting their VM’s? (US Central)
- Do I want to put it inside its own Virtual Network? (YES)
- Review firewall configuration required.
- Create peering from *nix machine Virtual Networks to the ADDS Virtual Network.
- Change subnets the *nix machines run in to use ADDS for DNS.
- Do I have any strange/internal DNS considerations to worry about? (Thankfully, NO)
- Will the customer want to administer ADDS beyond the Azure console in the cloud? (Thankfully, NO. Otherwise they would HAVE to deploy a Windows machine in Azure, see: https://aka.ms/aadds-admindomain)
After thinking about those, and many other things, ADDS spun up without drama in about 30 minutes. I then did some of my prerequisite DNS changes in various subnets.
2.) The next obvious step is, configure the *nix machines to use this new ADDS functionality you deployed. Here is a very rough guide on how I did this. Again, there is so much nuance to this… you really need to plan this out and lab it up like any SSO project. This is bare bones as it gets here.
2a.) Reconfigure the machine to use the new ADDS DNS ip’s. In my case, the machines were all using DHCP so nothing to do except bounce the lease. If you are managing DNS outside of DHCP, you will have o “do the thing” with nmcli, resolv.conf… whatever applies to your environment.
2b.) Install the necessary packages. In my demo, I’m on CentOS 7.x:
# yum install -y realmd oddjob oddjob-mkhomedir sssd samba-common-tools adcli krb5-workstation
2c.) Configure the machine to use ADDS:
We have a couple different paths we can take here: realm or adcli. In my case, realm as A-OK for my use case. XXXXX == being ADDS name of course.
[root@XXXXXX-www01 ~]# realm join XXXXXX.onmicrosoft.com -U adminuser@XXXXXX.ONMICROSOFT.COM -v
* Resolving: _ldap._tcp.XXXXXX.onmicrosoft.com
* Performing LDAP DSE lookup on: 10.0.3.5
* Successfully discovered: XXXXXX.onmicrosoft.com
Password for adminuser@XXXXXX.ONMICROSOFT.COM:
* Required files: /usr/sbin/oddjobd, /usr/libexec/oddjob/mkhomedir, /usr/sbin/sssd, /usr/bin/net
* LANG=C LOGNAME=root /usr/bin/net -s /var/cache/realmd/realmd-smb-conf.RQ0NB0 -U adminuser@XXXXXX.ONMICROSOFT.COM ads join XXXXXX.onmicrosoft.com
Using short domain name — XXXXXX
Joined ‘XXXXXX-WWW01’ to dns domain ‘XXXXXX.onmicrosoft.com’
* LANG=C LOGNAME=root /usr/bin/net -s /var/cache/realmd/realmd-smb-conf.RQ0NB0 -U adminuser@XXXXXX.ONMICROSOFT.COM ads keytab create
* /usr/bin/systemctl enable sssd.service
Created symlink from /etc/systemd/system/multi-user.target.wants/sssd.service to /usr/lib/systemd/system/sssd.service.
* /usr/bin/systemctl restart sssd.service
* /usr/bin/sh -c /usr/sbin/authconfig –update –enablesssd –enablesssdauth –enablemkhomedir –nostart && /usr/bin/systemctl enable oddjobd.service && /usr/bin/systemctl start oddjobd.service
* Successfully enrolled machine in realmAt this point, unless you want to fully qualify your users, you might want to edit your /etc/sssd/sssd.conf and change use_fully_qualified_names to: False and then restart the sssd daemon.
3.) At this point, if all has gone well, you should be able to see the user objects & groups which have flowed from on-prem to ADDS:
[root@XXXXXX-www01 ~]# id testuser
uid=691801111(testuser) gid=691800513(domain users) groups=691800513(domain users),691801104(aad dc administrators),691801113(linux-sudo_all),691800520(group policy creator owners),691801102(dnsadmins),691800572(denied rodc password replication group)[root@XXXXXX-www01 ~]# groups testuser
testuser : domain users aad dc administrators linux-sudo_all group policy creator owners dnsadmins denied rodc password replication groupAt this point, … time to start configuring things like your allowed ssh groups, sudoers … all that fun stuff. Extra points if you manage your SSH keys in a secure and automated fashion as well for another layer of security.
Some final thoughts:
If you’ve used Azure AD Connect, you know there can be lag issues for the impatient. ADDS adds yet another layer into the mix. On top of everything else, you’re now waiting for AAD to synchronize into ADDS too. So between on-prem -> AAD -> ADDS … it can be a while for changes/new objects to become a reality. Keep this in mind, and if this is a non-starter for you… look for another solution.
This customer pretty much doesn’t even allow interactive access to their production *nix infra (a good thing!), so this was really just needed for the basics if the … you know what … hit the fan.
My customer was a small shop, so the pricing worked out to be about (at the time of this post) around $110/mo for ADDS. They considered this a huge win over a Windows VM + the overhead of managing and securing it.Til next time…
-
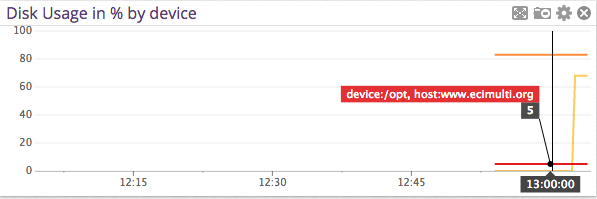
Making Datadog report mount points vs. device names
Posted on March 10th, 2015 No commentsThis will seem like a really dumb post, but I scratched my head on this for a bit. I really wanted my Datadog storage dashboards to report mount point name vs. device names. I couldn’t really find much help within Datadog’s documentation either.
After going down a few paths, I bumped into this in the datadog.conf:
# Use mount points instead of volumes to track disk and fs metrics

use_mount: no
I changed that over to yes, and boom … problem solved!
-
EMC CLARiiON CX Disk Offset Configuration
Posted on March 17th, 2010 No commentsI’ll be updating this with various OS method of setting the disk offset. This is mostly for me to consolidate my notes. It should be noted this is valid for MOST current EMC disk technologies, but you should always consult the documentation to make sure.
If anyone has an OS to add, or sees an error let me know.
Microsoft Windows Server 2003:
- Start -> Run -> cmd.exe
- diskpart.exe
- List disk and find the new LUN you’re wanting to offset by number
- select disk #, where # = the LUN you wanted in step 3.
- create partition primary align=X, where X = 32, 64 or 128 (in my case, 64).
- format the disk in disk manager/assign a letter/use a mount point.
Microsoft Windows Server 2008:
Technically this is no longer required. This is because Server 2008 automatically sets the offset to 1MB on partition creation.
Linux / older (2.x) ESX / etc:
- On service console, execute “fdisk /dev/sdX” (or “fdisk /dev/emcpowerX” for clariion systems), where X is the device on which you would like to create the new partition (a, b, c, etc).
- Type “n” to create a new partition
- Type “p” to create a primary partition
- Type “1” to create partition #1
- Select the defaults to use the full disk.
- Type “t” to change partition type
- Type “1” to select partition #1
- Depending on your Linux environment and need: type “83” to set type to Linux partition, or type “82” to set type to Linux swap, or type “8e” to set type to Linux LVM, or type “fb” to set type to VMFS (vmware file system). For other partition types, type “L” to display the list of codes.
- Type “x” to get into the expert mode
- Type “b” to specify the starting block of partitions
- Type “1” to select partition #1
- Type “128” to make partition to align on 64KB boundary (block No. 128)
- Type “w” to write new partition information to disk.
- Exit fdisk and format the partition with your favorie filesystem.
Solaris:
To be added.
-
ESX, Linux LVM, file system expansion and you.
Posted on December 9th, 2009 No commentsI see quite a few methods being used out there for logicial volume expansion. Everything from what I’m about to post all the way down to folks using cloning tools like Ghost and Clonezilla. Heres how I do it, and it works good for me. Note that I typically do these offline, for no other reason than I’ve biffed enough servers in my life to not be in a rush. If you’re needing 5-9’s uptime, look for another blog. It seems more than anything I have to expand / and so that also can play into this.
Likely a good idea to visit the LVM man pages and/or this site if your LVM is a bit weak: read this and maybe also this.
- Shutdown the VM.
- Extend the VMDK you’re working with. You have a couple choices here. You can either extend it from the service console like so: vmkfstools -X 5G /path/to/the/vmdk (would add 5GB to that VMDK) or you can also extend it in the Virtual Infrastructure Client. If you use the service console, look at the options for vmkfstools for the exact syntax for your case.
- I think it goes without saying you should have backups and/or snapshots of the VM.
- Boot the LiveCD for your particular flavor of Linux. There are LVM LiveCD’s out there too, and also I bet a Knoppix disc might even work if in a pinch. I happen to run SLES & openSUSE pretty much exclusivly and the LiveCD’s work pretty well.
- Use fdisk and partition your new found space properly. Make sure you change the type to LVM (8e). If you’re not savvy with fdisk, you should likely stop now.
- So lets say the new partition you created is /dev/sda5. You now need to create a new physical volume, use the command: pvcreate /dev/sda5 and with any luck it’ll complete.
- Now you need to extend the volume group to the physical volume you just added. Use the command: vgextend *volumenamehere* /dev/sda5. Use vgdisplay if you don’t know which volume group you need to extend off the top of your head.
- Finally, its time to extend the logical volume itself. Use this command: lvextend -L 5GB /your/logical/volume/here. Use lvdisplay if you don’t know which LV you want to extend by heart. In this example I added 5GB to the volume. If you wanted to consume all space on the VG, you’d use something like this: lvextend -l +100%FREE /your/logical/volume/here
- At this point, if everything worked, you can expand the file system. On the systems I administrate we typically use XFS these days. XFS requires the filesystem to be online to grow. So while in the LiveCD you can quickly mount say /dev/system/root to /mnt and then execute xfs_growfs /mnt. Research the proper way to grow whatever file system YOU happen to use.
- Reboot the VM and make sure all is well.
Till next time…
-
Quick & dirty PXE boot server using openSuSE.
Posted on June 7th, 2009 No commentsLately I’ve been dinking around with Clonezilla and other free disk imaging systems (more on that later), and using CD’s or USB keys can get tiring very fast. Besides Solaris Jumpstart servers, I’d really never gone down this path before. Turns out its quite simple, and you should be able to get it going in 20-30 minutes tops!
I’m going to assume the readers of this have some cursory knowledge here. It should be noted that I added a DNS & Squid server to the mix here only because my server build VLAN is isolated from the world. I wanted to be able to patch them current after the image was deployed. If you don’t have those requirements, don’t install them.
Quick network overview: My PXE boot server VM has one foot in a network with internet access, and the other foot is in an isolated build network. From this isolated network I image, patch and then scan the new machines for vulnerabilities.
1.) Install the operating system. For this example I used openSuSE 11.1 on a pretty low-rent VM. Think 256MB of RAM and 4GB of disk or there abouts.
2.) After you have the operating system installed, add the following packages with yast:
- bind
- yast2-dns-server
- atftp
- syslinux
- dhcp-server
- yast2-dhcp-server
- squid
- yast2-squid
Yast will then complain about needing a bunch of dependencies, so just let it rip.
Okay, so now that you have all of that installed.
3.) Configure the DNS server with the appropriate forwarders (if you want) and all that jazz. However you like just so that the server can resolve. If you want, setup a fake dns zone like serverbuild.local. You could even setup a reverse zone for your bogus privately IP’d build network if you’re feeling really froggy.
4.) Configure & start the DHCP server with appropriate IP range, IP to bind to (you most likely don’t want to have DHCP server on your public side!) and dynamic DNS to the aforementioned configured DNS server, should you so choose. The last three lines are PXE boot/tftp boot specific. Here is my /etc/dhcpd.conf:
option domain-name “serverbuild.local”;
option domain-name-servers 10.0.0.1;
default-lease-time 14400;
ddns-update-style none;
subnet 10.0.0.0 netmask 255.255.255.0 {
range 10.0.0.10 10.0.0.240;
default-lease-time 14400;
max-lease-time 28800;
server-name “10.0.0.1”;
next-server 10.0.0.1;
filename “/tftpboot/pxelinux.0”;
}5.) Configure & start the TFTP server. Once again I’d restrict this to your private side, unless you really want a TFTP server open to lots of folks (you don’t). Here is my /etc/sysconfig/attftpd:
## Path: Network/FTP/Atftpd
## Description: ATFTP Configuration
## Type: string
## Default: “–daemon ”
#
# atftpd options
#
ATFTPD_OPTIONS=”–logfile /var/log/atftpd.log –daemon –user tftp -v”## Type: yesno
## Default: no
#
# Use inetd instead of daemon
#
ATFTPD_USE_INETD=”no”## Type: string
## Default: “/tftpboot”
#
# TFTP directory must be a world readable/writable directory.
# By default /tftpboot is assumed.
#
ATFTPD_DIRECTORY=”/tftpboot”## Type: string
## Default: “”
#
# Whitespace seperated list of IP addresses which ATFTPD binds to.
# One instance of the service is started on each IP address.
# By default atftpd will listen on all available IP addresses/interfaces.
#
ATFTPD_BIND_ADDRESSES=”10.0.0.1″6.) Hopefully I’m coherent enough on the following steps:
If it doesn’t already exsist, make a /tftpboot directory and copy /usr/share/syslinux/pxelinux.0 to /tftpboot. While you’re at it also make a directory called /tftpboot/pxelinux.cfg.
7.) Create a file with the following contents named /tftpboot/pxelinux.cfg/default:
default harddisk
# hard disk
label harddisk
localboot 0x80# clonezilla live
label clonezilla
kernel vmlinuz1
append initrd=initrd1.img boot=live union=aufs noswap noprompt ip=frommedia fetch=tftp://SERVERIPHERE/filesystem.squashfsimplicit 1
gfxboot bootlogo
display message
prompt 1
timeout 600Change the SERVERIPHERE to represent your TFTP servers private IP.
8.) Obtain the latest Clonezilla live cd .zip file, or one you’ve created custom (more on that later!). Unzip the .zip file in a location of your chosing and then copy live/vmlinuz1, live/initrd1.img and filesystem.squashfs to /tftpboot.
In case you’re not in the know, vmlinuz1 = the kernel, initrd1.img = initial RAM disk image and filesystem.squashfs = the file system with all of the fun clonezilla stuff in it. I’m over simplifying things here, but whatever.
For more details, see this link: http://www.clonezilla.org/clonezilla-live/livepxe.php
9.) Create the message file you’ll see when your machine PXE boots named /tftpboot/message. This is what mine contains:
Clonezilla PXE Boot
To start the imaging system enter ‘clonezilla’ and press enter.
Available boot options:
harddisk – Boot from Harddisk (this is default)
clonezilla – CloneZille Live CDAssuming you have all of the services started, you should now see this menu on the server(s) you wish to image. Type clonezilla and in theory the Clonezilla build environment should begin to load. This all works very nicely on my IBM blade servers.
While in this example I focused on Clonezilla, you could replace (or add) any linux kernel & initrd (plus any other associated files) your little heart desires in the /tftpboot/pxelinux.cfg/default. Like for example a RedHat server build environment or whatever you might need. I assume you could easily shove in a BartPE/WinPE image too if you wanted.
I’ll run through this again later in the week to make sure I didn’t miss something huge.
I didn’t really get into configuration of the Squid proxy I guess, but there are plenty of HOW-TO’s out there for that!
Till next time…
-
Manually reactivate LVM’s in Linux
Posted on March 2nd, 2009 No commentsI’m not sure what the deal is, but often when you boot Linux up single user you only get the root volume group activated. This could be totally normal behavior, and no big deal. When you have /usr /var and other portions of the file system broken up … it becomes a big deal.
After looking around the lvm man page awhile, this worked for me.
Before:
# lvm lvscan
Failed to find sysfs mont point
inactive ‘/dev/var/var [7.99 GB] inherit
ACTIVE ‘/dev/system/root [7.80 GB] inherit
ACTIVE ‘/dev/system/swap [2.00 GB] inheritExecute this:
# lvm vgsan
# lvm vgchange -ayAfter:
# lvm lvscan
Failed to find sysfs mont point
ACTIVE ‘/dev/var/var [7.99 GB] inherit
ACTIVE ‘/dev/system/root [7.80 GB] inherit
ACTIVE ‘/dev/system/swap [2.00 GB] inheritYou may now mount volumes as normal for maintenance.
-
Dynamically rescan LUN’s on SLES
Posted on February 24th, 2009 No commentsI’m sure this is kids play to most people, but I’ve just not done much SAN work with Linux.
We bought a new EMC CLARiiON CX4-240, and I was just tossing it random LUN’s to do speed & HA tests. When I added a LUN I’d see it in powermt, and I didn’t know what the equivalent of devfsadm was in Linux … SLES to be specific. What can I say, I worked with Solaris way too long.
The first step is to run: powermt display
# powermt display
CLARiiON logical device count=3
================================================
—– Host Bus Adapters ——— —— I/O Paths —– —— Stats ——
### HW Path Summary Total Dead IO/Sec Q-IOs Errors
================================================
3 qla2xxx optimal 6 0 – 0 0
4 qla2xxx optimal 6 0 – 0 0Note the 3/4 preceding the HBA’s.
Now, execute this:
# echo “- – -” > /sys/class/scsi_host/host3/scan
# echo “- – -” > /sys/class/scsi_host/host4/scanIts my understand this also works on RHEL and others, but YMMV. This is all buried in the PowerPath manual too, but hopefully I’ve saved someone a bit of time.
Till next time…